Using Docker to Run Apollo
You can install Docker for your system if not previously done.
Running the Container
You can see Apollo straight away:
docker run -it -p 8888:8080 gmod/apollo:stable -v /jbrowse/root/directory/:/data
Open http://localhost:8888 in a web browser and login with admin@local.host / password to get started.
Note: data is not guaranteed to be saved in this manner, but data is /jbrowse/root/directory will not be written to either.
Production
To run in production against persistent JBrowse data and a persistent database you should:
docker pull gmod/apolloif runninglatestbuild to guarantee you are using the latest build (not necessary for point releases).- Create an empty directory for database data, e.g.
/postgres/data/directoryif you want to save data if the image goes down. - If you want to upload tracks and genomes directories, create an empty directory for that, e.g.,
/jbrowse/root/apollo_data - Put JBrowse data in a directory, e.g.
/jbrowse/root/directory/. - If publicly visible set a username and password
    docker run -it  \
    -v /jbrowse/root/directory/:/data  \
    -v /postgres/data/directory:/var/lib/postgresql  \
    -v /jbrowse/root/apollo_data:/data/temporary/apollo_data \
    -e APOLLO_ADMIN_EMAIL=adminuser \
    -e APOLLO_ADMIN_PASSWORD=superdupersecretpassword \
    -p 8888:8080 gmod/apollo:latest
- As above, open http://localhost:8888 in a browser to begin setting up Apollo.
Additional configuration
See docker run instructions to run as a daemon (-d) and with a fresh container each time (--rm) depending on your use-case.
Additional options could be to set memory (required for running production off a mac) --memory=4g, running a docker daemon d or adding debugging to the server -e "WEBAPOLLO_DEBUG=true". For example (after creating the local apollo_shared_dir):
docker run --memory=4g -d -it -p 8888:8080 -v `pwd`/apollo_shared_dir/:`pwd`/apollo_shared_dir/ -e "WEBAPOLLO_DEBUG=true" -v /postgres/data/directory:/var/lib/postgresql gmod/apollo:latest
You can configure additional options by setting environmental variables for docker apollo-config.groovy by passing
through via multiple -e parameters.
For example:
- Change the root path of the url (e.g., http://localhost:8888/otherpath) by adding the argument
-e APOLLO_PATH=otherpathwhen running.
NOTE: If you don’t use a locally mounted PostgreSQL database (e.g., creating an empty directory and mounting using -v postgres-data:/var/lib/postgresql)
or set appropriate environment variables for a remote database
( see variables defined here) your annotations and setup may not be persisted.
Notes on releases and availability
The image is available on docker hub.
On docker hub you always pull from gmod/apollo:release-<version> where version is something like 2.6.2.
Versions
On docker hub versions are stable is the master branch or the latest stable release (e.g., 2.6.0), latest is the checkin, which has not necessarily been thoroughly tested and release-X.Y.Z represents the release of the tag X.Y.Z (e.g., release-2.6.0).
quay.io mirrors tags and all branches directly. So master is master and X.Y.Z is the same. So quay.io/<user or orgname>/apollo:2.6.0 is the same as <user or org name>/apollo:release-2.6.0, but you’ll have to fork your own version
See what is avaiable for docker hub builds.
Logging In
The default credentials in this image are:
| Credentials | |
| — | —————— |
| Username | admin@local.host |
| Password | password |
Example Workflow
- Make the following directories somewhere with write permissions:
postgres-dataandjbrowse-data. - Copy your jbrowse data into
jbrowse-data. We provide working sample data. - Run the docker-command:
docker run -it -v /absolute/path/to/jbrowse-data:/data -v /absolute/path/to/postgres-data:/var/lib/postgresql -p 8888:8080 gmod/apollo:latest - Login to the server at
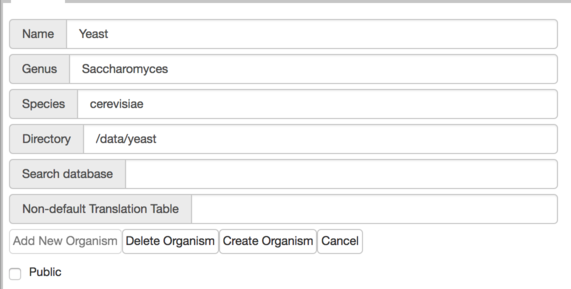
http://localhost:8888/ - Add an organism per the instructions under Figure 2. Using yeast as an example, if you copy the data into
jbrowse-data/yeastthen on the server you’ll add the directory:/data/yeast.
Running your own preloaded data in a fork
Here is an example of running pre-loaded data from Apollo: https://github.com/alliance-genome/agr_apollo_container
Note that important changes here are in:
To create this we loaded the original, configured as we wanted and dumped the sql file out.